[nextpage title=”Page 1″]Today we are going to convert last years Mac Mini from desktop-computer duties to a powerful VMWare ESXi Hypervisor lab server. To upgrade this Mac for ESXi we will add a second hard disk, (we still want the ability to dual-boot back into Mac OS X). Using the OWC Data Doubler SSD/2.5″ Hard Drive Installation Kit we will be able to install a Crucial MX100 512GB 2.5-Inch SATA III Internal SSD or any of the other 2.5 inch Solid State Drives to use as the VMWare Datastore. While we are at it, we are going to upgrade the memory using the Crucial 16GB Memory Kit.
Let’s start by disassembling the Mac. First thing we will need to do is rotate the bottom cover to line up the marks and lift the cover off.

With the cover removed we can go ahead and swap out the RAM now by spreading the clips holding the chips in their sockets and lifting the memory modules out. Slip the new memory modules into the sockets and press them down into place.

[/nextpage][nextpage title=”Page 2″]Now remove the three screws holding the fan in the chassis and lift the fan out. Gently remove the fan’s power wire from the socket.

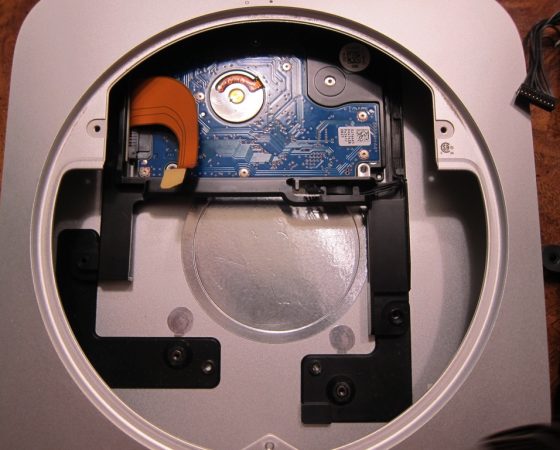
Withe the fan removed we can get to the screw that is holing the heat-sink cover in pace. Remove the cover by pulling it toward the center of the chassis and move on to removing the four screws that hold the wifi antenna cover and hard disk in place.

Slide this cover toward the center of the chassis and carefully remove the wifi antenna plug.

[/nextpage][nextpage title=”Page 3″]Use your spudger tool to lift the Infrared Sensor wire out of it’s socket and remove the hard disk drive socket.

Remove the screws holding the motherboard in place.

Insert the motherboard removal tool that came with the OWC Data Doubler SSD/2.5″ Hard Drive Installation Kit into eh holes in the motherboard and move the tool toward the back on the mac. Only move the motherboard a short distance so that you can access the main power plug.

[/nextpage][nextpage title=”Page 4″]Slide the main power plug out of the socket on the motherboard and slide the motherboard out of the chassis.

You can remove the hard disk now by gently lifting the edge of the hard drive and pulling it away from the front of the chassis.
Remove the screw holding the power supply in the chassis.

Now remove the metal AC socket retainer by sliding it toward the center of the chassis.

[/nextpage][nextpage title=”Page 5″]Rotate the AC connector counter clockwise and slid the power supply out of the chassis.

Remove the one remaining screw holding the hard drive tray and lift the tray out of the case.

Insert the included hard disk grommets into the hard drive tray.

[/nextpage][nextpage title=”Page 6″]Gently bend the hard disk ribbon cable into the correct shape using the dotted lines as a guide.

Install the drive in the tray and reassemble the Mac in the reverse order of disassembly.
Parts used in this installation:
OWC Data Doubler SSD/2.5″ Hard Drive Installation Kit
Crucial MX100 512GB 2.5-Inch SATA III Internal SSD or any other 2.5 inch Solid State Drive
Crucial 16GB Memory Kit
Now we can move on to installing VMWare ESXi on our Mac Mini server.
[/nextpage]
Comments are closed.