Today I’m going to preform an Ubuntu 10.04 LTS Server Minimal Virtual Machine installation in a newly created Oracle VirtualBox VM.
On initial boot you will be prompted to select your language.

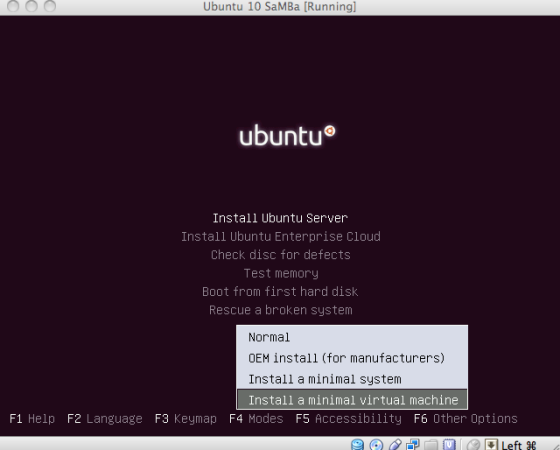
Press F4 to bring up the Installation Modes menu and select “Install a minimal virtual machine” to install the VM optimized kernel. Then select “Install Ubuntu Server.

Select the installation language

Select your country.

Choose whether or not to detect your keyboard layout.

Select keyboard origin.

Select Keyboard Layout

Set your servers hostname.

Confirm or change time zone.

For this machine I’m going to choose Guided partitioning.

Select the disk to partition.

Choose Yes to write partition changes.

The VM will now install your server’s base system.

Create your first user account by first entering the full name for this account.

Then choose the username.

And your password.

Confirm your password.

Choose whether or not to encrypt your home directory.

Enter proxy information or just Continue if your network does not employ HTTP proxy.

Setup automatic upgrades to your server.

For this machine, I am going to install only the OpenSSH services to remotely administer this machine.

Install the GRUB boot loader to the MBR.

Click Continue to boot into your new Ubuntu 10.04 LTS Server Minimal Virtual Machine.

After initial boot I’ll login through ssh and do an aptitude update:
localhost:~ nmino$ ssh -l nmino ubuntu-pdc
The authenticity of host ‘ubuntu-pdc (0.0.0.0)’ can’t be established.
RSA key fingerprint is 2a:12:db:8f:c5:6d:d3:10:06:04:cf:04:1e:45:9f:d6.
Are you sure you want to continue connecting (yes/no)? yes
Warning: Permanently added ‘ubuntu-pdc,0.0.0.0’ (RSA) to the list of known hosts.
nmino@ubuntu-pdc’s password:
Linux ubuntu-pdc 2.6.32-38-generic-pae #83-Ubuntu SMP Wed Jan 4 12:11:13 UTC 2012 i686 GNU/Linux
Ubuntu 10.04.4 LTS
Welcome to Ubuntu!
* Documentation: https://help.ubuntu.com/
Last login: Thu Mar 28 11:28:39 2013
nmino@ubuntu-pdc:~$
nmino@ubuntu-pdc:~$ sudo apt-get update
After this I’m going to run an initial software upgrade:
nmino@ubuntu-pdc:~$ sudo apt-get upgrade all
This server is installed on our network and ready to be configured to provide network services.
Comments are closed.